Thursday, January 24, 2013

Sketti Bread


The hubby and kids LOVE this meal!  It is super easy to make.

You will need...

  • 1 can of pillsbury bread
  • 1 lbs. hamburger
  • 1 jar of tomatoes sauce
  • 1 package of thin spaghetti noodles
  • 1 can of mushrooms drained (optional)
  • garlic salt (enough for sprinkling on top of the bread after braided)
  • 2 cups shredded cheese
How to make...

  1. Start boiling the noodles..
  2. While noodles are boiling use a skillet and cook the hamburger (adding any spices you would like)..
  3. When hamburger is almost finished add the can of drained mushrooms..
  4. When noodles, hamburger/mushroom mix are finished put into a large bowl.
  5. Add the sauce to the burger/noodle mix. 
  6. Mix this well.
  7. Roll out the bread dough on a jelly roll pan and fill the center with the hamburger/noodle mix.
  8. Top the mix with some shredded cheese.
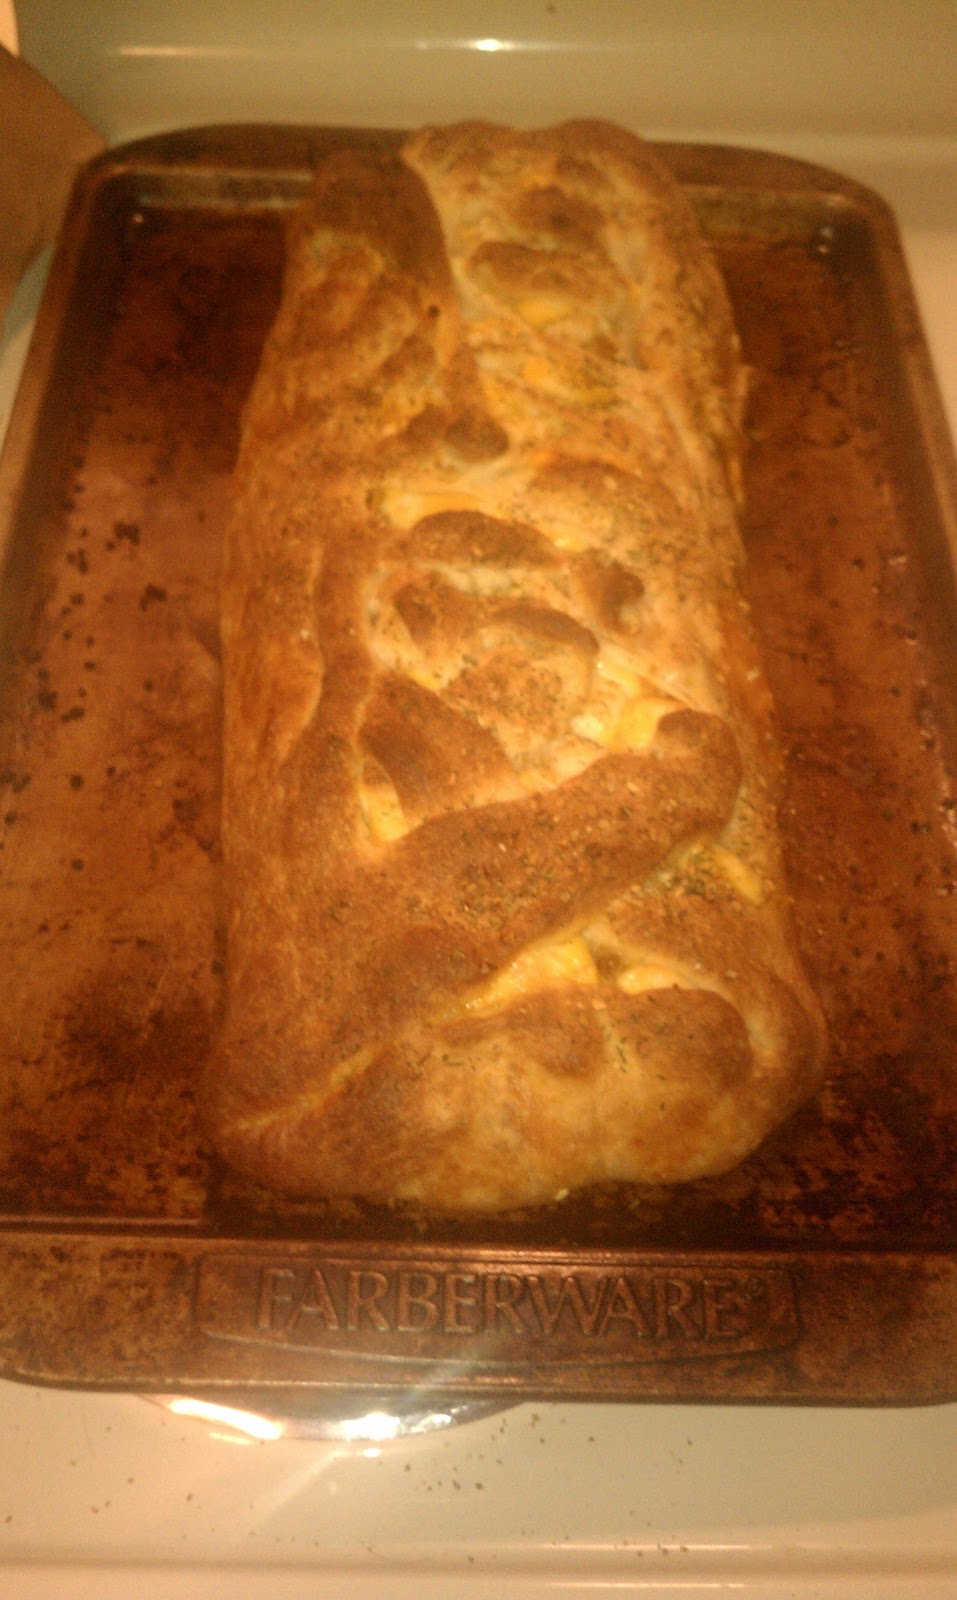
  9. Cut the sides about 2 inches in then criss-cross them to "close" the bread.
  10. Sprinkle some cheese and garlic on the top of the closed bread.
  11. Bake as direct on the bread package.
  12. When it is finished let cool.
  13. Once cooled cut like a bread loaf and enjoy!


**We made this for my son's 3rd birthday and was a HUGE hit at the party!

*** I have also followed the same steps for the bread, but you fill it with cooked chicken cubes, cheese and broccoli.

Tuesday, January 15, 2013

Twistband


I got the twist bands in the mail this weekend and I fell in LOVE with the colors right away!

They sent me 1 head band, some hair ties, and shoe laces.

The head bands are awesome!  I got one like this one.  I LOVE it!  They don't slide around on your head nor do they leave a bump in your hair after you are done wearing them.  They come in some pretty awesome colors as well! 

The headbands like the one I got are $4.50 each and can be purchased on the website.

Next I tried the hair ties.  I got a set of them and LOVE these as well.  They also come in a varity of colors as well. They also don't leave a dent in your hair.  I usually use the ouchless ones that really grip your hair otherwise I find myself redoing my ponytale all day!  This one stayed in plave GREAT and came out SUPER easy when I wanted it to.  I got a set like the ones seen here.


I haven't tried the shoe laces yet, so I can't review those.  These are the ones that I got and can't wait to try them!

You can find the head bands, hair ties, and shoe laces here.

Another great thing about Twistband is that they are made in the USA!

You can go to the Twistband Facebook page here
or
You can go to the Twistband website here.

**I recieved 1 head band, a set of hair ties, and the shoe laces at no cost to myself for my honest opinion on the products.

The Bluapple

I received The Bluapple this week.  It is a lot smaller than what I was expecting it to be, which is great since it fits WONDERFULLY in my veggie drawer in the fridge.  (It is usually FULL of fruits and veggies!) 


Since I just put it in the drawer today I don't have much on an opinion on how it works.  I do however love the look and size of it!

After a couple days/weeks/month I will add updates to this post on how I feel it is working.

Here is a little info on The Blueapple.


Ethylene gas is given off by all living plants, especially by fruits, vegetables and flowers, and acts as a chemical signal to speed up the ripening process. The release of this gas is thought to be a mechanism by which plants promote uniform ripening or opening, etc. In nature, the uniformity of these events attracts the maximum number of pollinators or seed disseminators, such as birds and insects. At home, however, when you store your fruits and vegetables in the refrigerator, ethylene gas builds up. As a result the ripening process is accelerated too quickly. This is a major reason we all throw out so much spoiled produce!

The Bluapple is based on technology that has been used in ships, warehouses and trucks for many years to absorb and neutralize ethylene gas buildup. The Bluapple does not release any gas or chemical, but only absorbs, constantly removing this harmful gas from your produce storage area. The Bluapple is not a "magic" pill, but a scientific and essential part of keeping produce fresh. When produce was cheap, no one cared, but as prices have risen, it became apparent that a very beneficial product for the home could make a huge difference.

There are three key elements to long produce life: a) temperature - keeping produce cold; b) humidity - using vented plastic bags to keep a moist, but not wet environment; c) ethylene gas management - using the Bluapple. Disruption of any one of these elements will cause premature spoilage.

It may interest you to know that we provide a money back guarantee, which we are proud to honor. After selling many hundreds of thousands of Bluapples, we have processed only about 20 refund requests, to each of whom I have written a letter.

The Bluapple is a proven, science-based technology that we have adapted for use in the home. With a single gourmet apple costing $1.25 these days, our produce is an investment worth protecting. It is our view that the Bluapple is essentially FREE. Users easily recover the purchase price in savings within a few weeks, and the Bluapple continues to deliver value for many months thereafter.

 
 You can visit The Bluapple at their Facebook page here
or
You can visit The Bluapple at their website here


If you would like to purchase the Bluapple, or need refills for a current bluapple you can visit this link and order right from Bluapple.
 
A 2-pack like I recieved cost $9.95
A 12 month refill pack cost $9.95

Bluapple also has a deal where you can sign up and they will remind you when you need to change your Bluapple absorber.

Amazon has the 2-pack of Bluapple and a year supply of abosorber refills for $18.95 that you can find here.


**UPDATE
I have had the Bluapple in the veggie drawer for about a week now & I have yet to find something going bad!

**UPDATE Feb. 5th, 2013
I LOVE the Bluapple!  I can tell that my fruits and veggies are lasting longer.. I will definitely recommend this to my friends!

**UPDATE March 19, 2013
I still LOVE the Bluapple!  I really have nothing bad to say about it yet.  I have noticed that it DOES keep the fruits and veggies longer and I LOVE that because I am one that tends to stock my drawers FULL and then forget they are there.. BUT.. with the Bluapple that is ok! because they are still good when I remember they are there! :)

Tuesday, January 8, 2013

CrockPot PorkChops

I made these for Christmas Eve.  We wanted something simple with easy clean up.  (If you haven't tried the crock pot liners.. they are a MUST!)

Anyways.. on to the recipe! :)

You will need...
  • 9-12 pork chops
  • 5 cans cream of mushroom soup (I used mushroom & chicken)
  • 1 packet of dry ranch mix (I used the dry mix I made.  You can find it here. )
How to make...

  1. Put 2 cans of soup in then topped it with about 3-4 pork chops followed by 1-2 teaspoons of the dry mix.  (I did 3 layers of this with only using the ranch dry mix on the bottom and top layers.  Also, only 1 can cream of.. on the middle layer)
  2. Cook on HIGH for about 4-6 hours, then switch to low/warm till you are ready to eat it. (I had mine on high for about 4.5 hours and low for about 3 hours.)

When you are ready to eat the soup mixture that is left in the pot is GREAT to use as gravy on mashed potatoes!

Single Fruit Pizza

I first made these for my sister-in-laws baby shower.  I wanted easy food, something we didn't need someone to be standing by to dish out & who doesn't LOVE fruit pizza?!


What you will need...
  • 1 package of ready to bake Pillsbury Sugar Cookies (I used the break & bake ones)
  • 1 cup sugar
  • 1 package of cream cheese at room temp. (I used the whipped stuff, not the brick)
  • 1 teaspoon vanilla
  • fruit of your choice
 How to make...
 
  1. Bake the cookies as directed on the package.
  2. Cut/Wash the fruit if needed.
  3. Let the cookies cool.
  4. Mix sugar, cream cheese, & vanilla in a bowl and set aside till cookies are cooled.
  5. Frost cookies.
  6. Top with fruit.
  7. Refrigerate till you eat/Refrigerate leftovers
 
 
**blueberries, strawberries, and kiwi were used in the ones pictured.


Upcoming Reviews!

There are TWO products on their way for a review!

First one is from..

A t-shirt from Road Kill Shirts

Second one is from..

The Twist Band

Thursday, January 3, 2013

Play-Doh Super Tools Playset

**My daughter got these as a gift for Christmas.. Hasbro and/or Play-Doh did NOT send me this for a review.


The picture above was taken from the Play-Doh website

My 3 year old daughter got this as a gift for Christmas from a family friend.  She was SUPER excited to get Play-Doh!

I was also excited so we could make more homemade play-doh and we would have more than just cookie cutters to use to play with it!

Ours came with only 3 containers of Play-Doh.  (green, orange, and purple)

The squeeze 'n popper (first in line in the picture) the cut outs get stuck in it at times and you can't use the squeezer deal to "pop" it out.  You need to use your finger or knife to get it out.

The next tool, the twirl 'n twister, once you can get all the Play-Doh to come out the tool it is fun to play with, but it ALWAYS gets stuck and it all won't come out.

The last tool, the dial 'n stamper, is my daughters least favorite.  The Play-Doh gets stuck on it and you will have the circle of the stamper around it.

The kids (2 years and 3 years old), still love playing with them, and I don't think it bothers them much that they don't work like they are expected to.

You can purchase the set pictured above from the Hasbro - Play-Doh website for $7.99.  It also starts it is for ages 3 & up.

Here is the discription the website gives...

With this super-cool set of gadgets, you’ve got lots of ways to make silly, squishy and sensationally squeezable shapes and PLAY-DOH-style creations.
The DIAL ‘N STAMPER tool is a fast and fun way to stamp multiple shapes – it’s four stampers in one tool! Just twist, stamp and repeat!
Grab the TWIRL ‘N TWISTER tool to create colorful twists of compound – try it with two colors at the same time!
And for shapes that pop out with a simple squeeze, reach for the SQUEEZE ‘N POPPER tool.
When it comes to creativity, this is one tool set that definitely gets the job done! Set includes DIAL ‘N STAMPER, TWIRL ‘N TWISTER, and SQUEEZE ‘N POPPER tools, star mold, triangle mold and 4 two-ounce cans of PLAY-DOH compound.
Ages 3 and up.
NOTICE TO PARENTS: CONTAINS WHEAT. NONTOXIC.


S'more Cookies


These are super easy and the kids LOVE to help!

You will need...
  • 12 oz chocolate chips melted
  • 1 box of graham crackers
  • 1 jar of marshmallow fluff
How to make...
  • break the graham crackers into 4s
  • take 2 pieces of graham crackers & put some marshmallow fluff between the 2 graham crackers (I usually do all the graham crackers before I melt the chocolate chips)
  • melt the chocolate chips
  • dip 1/2 of the cookie in the chocolate
  • place on wax paper and let the chocolate harden

Enjoy!

S'more Sticks


These were super easy to make and the kids LOVED them!
 
I bought some Wilton Lollipop Sticks from Hobby Lobby awhile back.  I was trying to figure out how to use them, besides making suckers.  I came across a similar recipe to this and thought that I would tweak it a bit. I came up with this.
 
You will need...
  • 1 bag of chocolate chips (melted)
  • 1 bag of large marshmallows
  • 2 cups crushed graham crackers
  • 1 package lollipop sticks (I used 8in ones)


How to make...
  1. Push lollipop sticks in one end of the marshmallow making sure not to poke it all the way through
  2. Dip marshmallow into chocolate
  3. Dip/Roll in crushed graham crackers
  4. Place on was paper stick side up till chocolate hardens
  5. Enjoy!
 
These are also really good dipped in crushed candy canes instead of graham crackers, then use them to stir hot chocolate.


Wednesday, January 2, 2013

Easy Lemon Bars

My husband LOVES Lemon Bars, so finding this super easy recipe was WONDERFUL for me!
 
 
You will need..
  • 1 can of pie filling (I used lemon of course)
  • 1 box of angel food cake mix
 
  1. Grease & flour a jelly roll pan and set aside.
  2. In a bowl mix the pie filling and the DRY cake mix.
  3. Bake at 350 degrees for about 20 mins, or until bars look/feel spongy.
  4. When are finished, let them cool.
  5. Once cooled sprinkle with powered sugar.
 
Enjoy!


(The picture above is of the bars cooling before I put the powered sugar on.)
 
You can change out the pie fillings for any pie filling.  If you try another pie filling make sure to come back and let me know how you liked them! :)

Cresent Cinnamon Rolls

I originally found this recipe on Pinterest.  I am kind of in awe of the things you can do with cresent rolls.  Haha!
 
FIRST..
I used the "roll" type cresent rolls.  I opened the container of cresent rolls and unrolled them before I pulled them apart. (see photo below)


I think mixed the cinnamon & sugar. (Photo below)
  1 stick of room temp. butter (I used Blue Bonnet)
  1 teaspoon of cinnamon
  1 cup of sugar

..you want to make sure the butter is room temp or it won't mix in well with the cinnamon & sugar.


Then once mixed well, spread it all over the rolled out cresent rolls. (photo below)


Then roll them back up and pull them apart.  Then place them in a baking dish, NOT on a cookie sheet because the butter mixture will melt and fill the bottom of the dish.
 
...I used a 9x13 pyrex glass pan.


This is what they will look like after you take them out of the oven.  Bake them as directed on the package the cresent rolls come in.  (photo below)
If you look close you can see the butter mixture bubbling between the rolls.  This is why you don't want to make sure you use a cake pan or a jelly roll pan.  :)


For the frosting I just mixed powered sugar and milk.  I then put about a tablespoon of frosting over each cinnamon roll while they were still hot so it melted over top of them. (photo below)